Your Cart is Empty
Immerse yourself in a world of selections at one of our
stunning East Coast showrooms. Architessa sources our tile both
domestically and internationally, bringing the best of porcelain,
natural stone, ceramic, and more to convenient locations and through
our national commercial representatives Contact us to
explore an in-store or virtual appointment with an Architessan. Orders
ship worldwide or can be picked up at Architessa's warehouse
locations. Delivery options are available for orders within Virginia,
Maryland, and D.C.

Immerse yourself in a world of selections at one of our stunning East Coast showrooms. Architessa sources our tile both domestically and internationally, bringing the best of porcelain, natural stone, ceramic, and more to convenient locations and through our national commercial representatives.
Contact Us to explore an in-store or virtual appointment with an Architessan. Orders ship worldwide or can be picked up at Architessa's warehouse locations. Delivery options are available for orders within Virginia, Maryland, and D.C.

Architessa's tile showroom in Alexandria, VA is one of five metro area locations, and recently became the focus of a stunning remodel. The team at Architessa recognized the need for a standout installation that would capture the energy and style of the city—and we knew a bold, custom mosaic was the perfect solution.
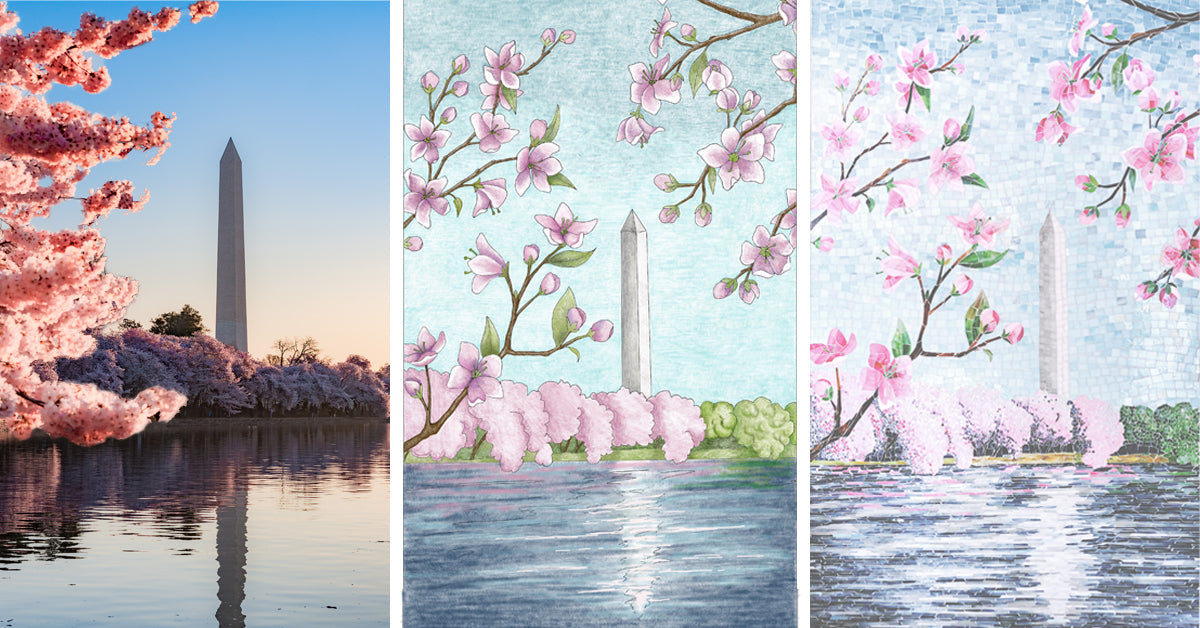
Having been part of the Washington, DC design community for over 40 years, we wanted something that paid tribute to the area's beauty and culture. A cherry blossom mosaic—an iconic symbol of springtime in DC—was a natural fit.

To bring this vision to life, we partnered with a local custom mosaic vendor to create a striking floral mosaic. Crafting a custom mosaic takes a bit of time and effort, but the payoff of a one-of-a-kind installation is worth the wait!
Follow along as we explain the process to designing and ordering a custom tile mosaic.
Every ordering process is a bit different, but the standard timeline can take between 12-18 weeks depending on a number of factors including size and intricacy of your design. You should check with your designer for details on timing and pricing.
Custom tile mosaics are a great way to bring your own unique sense of style into a project. While we opted to place our custom mosaic on a column, they are a great feature that can be placed anywhere from a kitchen backsplash to an outdoor fountain.

Create a mosaic based around your own style or theme. We have helped clients create compass roses, racing swimmers, and more - the only limit is your imagination!

The original inspiration for our cherry blossom design came from a golden flower mosaic we spotted at a tradeshow. From that initial idea, we found an inspiration image of the DC Tidal Basin in full bloom (much like the one above.) This served as the starting point for the design process.
Before you bring your design concept to your first design appointment, try to pull together some reference images and have an idea of the style and colors you're looking to use. The more info and inspiration references you have at the start, the easier time you'll have navigating the next steps with your designer.

Take exact measurements of the area where you want to install the mosaic. This step is something that your contractor or installer can help with.
Our designers and vendors then work together to create a scale rendering of your design. At this point, you should be sure to mention any changes to the overall color and composition of the sketch. It is also important to keep in mind how the mosaic will fit in with any surrounding tiles or interior design elements.
Architessa's custom mosaic was being placed on a central column as an accent piece, so we create an elongated vertical design which framed the Washington Monument nicely.
You can select the exact colors you would like for your custom glass tile mosaic by selecting glass colors and finishes. For our cherry blossom mosaic, we chose 14 different colors to complete the design.

To ensure that the custom mosaic process is proceeding as intended, a few sample swatches can be created for approval. These swatches have a minimal cost associated with production, but if approved they will be incorporated into the final product (and deducted from that cost.)
Once the custom mosaic is completed, you will have a chance to approve images of the final design. This is the last chance to make any changes before shipping.
- - -
We are so pleased with the result and we hope you are too! We invite you to visit our Alexandria showroom to see how beautifully the completed mosaic is.
This blog covered the basics of how a custom glass mosaic is created and ordered, but there are other custom tile options for ceramic and porcelain mosaics, cement, and natural stone waterjet designs. Explore our Custom Tile Page for more info on what's possible and reach out to our Architessa design team to start your own custom tile journey.
For more information on how you can create your own custom tile mosaic contact our design team at sales@architecturalceramics.com.